How to Transcribe Audio to Text
To transcribe audio to text accurately, there are only a handful of tools you need. You’ll need a word processor, some kind of audio player, and a few free hours. Of course, if you’re looking to do it accurately and quickly, it’s better to partner with a professional audio transcription service like Rev.
Get Started: Transcribe Your Audio to Text
Rev › Blog › Resources › Transcribe › Transcribe Audio to Text ›
Whether you choose to transcribe by hand or with a service provider like Rev, we encourage you to learn how to transcribe audio to text or video to text and see how it improves your workflow, no matter if you’re a journalist, researcher, interviewer, educator, in the entertainment industry, or just need to take meeting notes.
If you’d rather not transcribe audio yourself, just send your audio file or URL to Rev. We offer human and AI transcription services with unmatched speed and accuracy – we exist to solve all of your video and audio to text conversion needs.
Here are the basic steps for using the Rev transcription service:
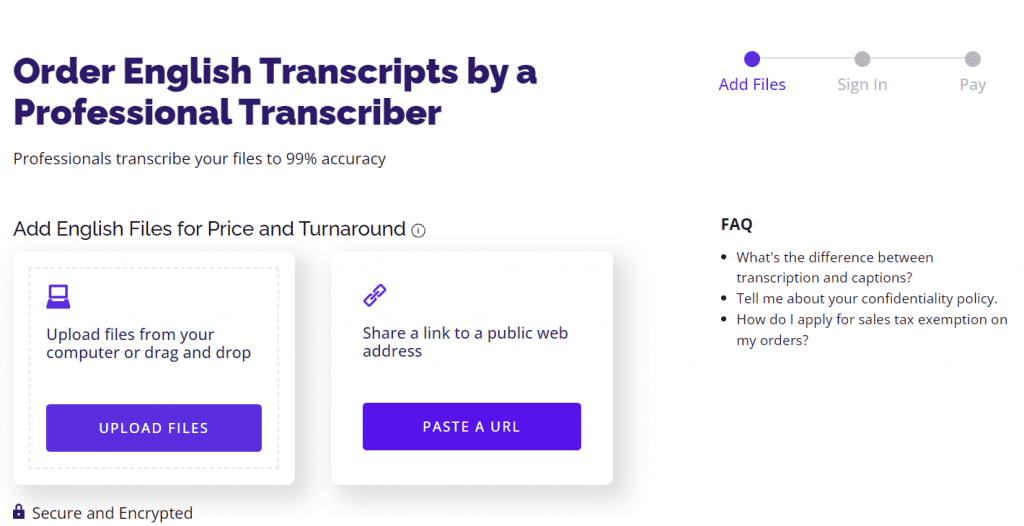
Step 1. Upload Your Audio File
Paste the URL of your audio media file, or upload the recorded audio file itself to our safe and secure network. You can upload voice recordings, recorded phone calls, podcasts, or anything that can be recorded in a digital file format and played with a media player.
Rev also transcribes video, so try converting video to text via a video file or URL (like a YouTube video).
You can choose Rev’s human audio transcription services ($1.50 per minute, with 99%+ accuracy) or the AI-powered auto audio transcription services (25 cents per minute, with 90%+ accuracy). Rev’s automatic transcription software provides a quick and affordable way to transcribe audio.
Rev’s transcription service has a very quick turnaround time – for example, a 30-minute file is usually completed within 24 with our premium service. Our automatic transcription service can process a 30-minute file in about 5 minutes. Shorter files have quicker turnaround times with both transcript options.
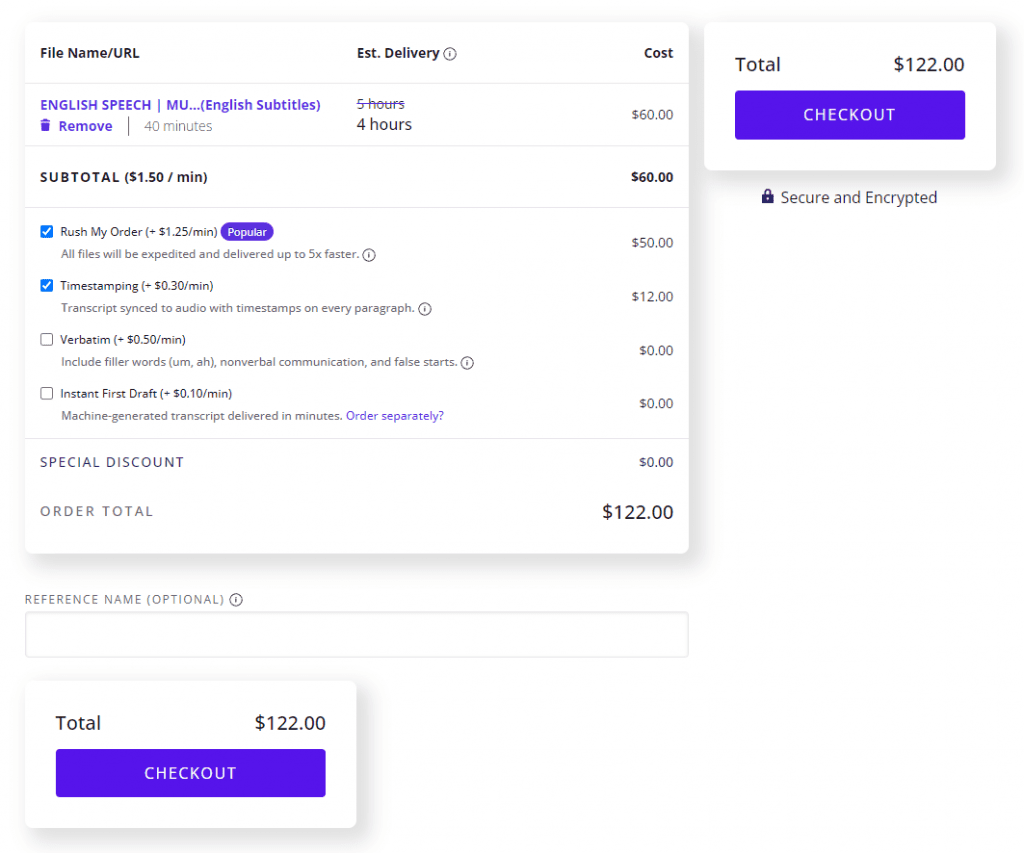
Step 2. Choose Custom Transcription Options
Rev also offers additional options to ensure that your audio or video to text transcript gives you exactly the files and materials you need to get the most out of your transcript. Here are a few of the ways you can customize your transcript order from Rev:
- Rush My Order – Get your transcript back 5 times faster.
- Timestamping – Sync your audio with timestamps on every paragraph. This allows you to jump to specific parts of the audio transcript.
- Verbatim – Catch every word. Ums, ahs, and mm-hmms.
- Instant First Draft – AI-generated transcript delivered in minutes
Step 3. Receive & Download Your Text File
We’ll handle all the transcribing, editing, and file formats. You’ll be notified in an email when your file is ready and you can download it instantly.
You can also use the free Rev Transcript Editor for finalizing and perfecting your transcript.
How to Transcribe Audio Files to Text Yourself
If you’re looking to learn how to transcribe audio to text yourself, we’ve got some pro tips for you. Before you read the step-by-step guide, remember that patience is also a huge part of transcribing audio to text. If the process is slow at first, don’t worry. You’ll get better with practice.
Step 1: Getting Set Up
The process of transcribing audio or speech to text is not complicated, but you can make it much less efficient if you aren’t set up for success. Give yourself easy access to both your word processor and your audio file. You’ll be rewinding frequently, and you don’t want to add minutes to your process by constantly switching tabs and losing your place.
Step 2: Finding Your Shorthand
Some things, like the speakers’ names, will recur constantly while you’re transcribing the audio file. Make a quick reference of shorthand for these things you know you’re going to type over and over.
If you’re the only person who will use the transcription, you’ll know what the shorthand means. If you plan to share the file with more people, you can either provide them with a key to reference, or do a quick find and replace with the real names when you’re done.
Step 3: Writing What You Hear
This is the easiest part. Listen to your audio file and type what you hear. Depending on the subject matter of the audio or video, you may need to run some quick Google searches to ensure that you’re referencing the proper terms and that everything is spelled correctly.
Step 4: Editing Your Text File
Once you’re done with your transcription, take one last listen through your audio file to fix any errors. Be careful to check for any titles, references, or context you might have missed, especially if you focused on simply typing what was said word for word.
Step 5: Exporting the Correct File
The file extension you use to save your text file is important. People who want to keep the text for themselves to edit or share later can simply save it as a .doc file. However, if you plan to use audio-to-text transcription for video subtitles or any other multimedia format, make sure you confirm what kind of file you need.
For a quick reference, check out this article on which file type you should use depending on the platform or software you’re using.
Businesses & Corporations: How Transcribe Audio to Text with the Rev AI API
If your large business or corporation is looking for scalable transcription services, the best way to integrate audio and video transcription into your daily workflows is by requesting API access and integrating Rev’s industry-leading speech recognition engine into apps or work environments you already have.
Sign Up & Create a Rev AI Account
Creating an account with Rev is simple – we even offer 5 hours of free credit for your audio transcription needs. Sign up for Rev.
Get Your API User and Client Keys
Once your account is set up, you will receive an API user and client key – once you’ve gotten the key, you’re all set to get started.